Date
Collaborative coding can benefit from having everyone use the same computing environment, including the same versions of packages, data, and code. In Python, this can be done using virtual environments. You can create a virtual environment for each project or analysis, as long as they are in different directories. On SESYNC’s Jupyter server, it takes a little set-up to start using virtual environments.
1) Make a Pipfile
A Pipfile stores the information about your virtual environment and the dependencies of your project. It replaces the requirements.txt file that can be used in Python projects. If you have a Pipfile already, use the terminal to change to the directory containing your Pipfile, and run this code to see the path to your virtual environment.
pipenv --venv
If you don’t have a Pipfile, change to the directory where you would like to create one, and run
pipenv install
2) Check for ipykernel
Take a look at the contents of the Pipfile and see if it includes ipykernel. You can view this file by typing cat Pipfile in your terminal, or by opening it through your file browser with any text editor. Your Pipfile will look something like
[[source]]
url = "https://pypi.org/simple"
verify_ssl = true
name = "pypi"

[packages]
ipykernel = "*"

[dev-packages]

[requires]
python_version = "3.8"
If your Pipfile doesn’t include ipykernel, run this code (it may take a few minutes).
pipenv install ipykernel
3) Activate!
Then you can activate your virtual environment by running
pipenv shell
4) Name your environment and make it available
Next, add the kernel by running the following code. Give your kernel a name and a display name of your choosing by replacing <”kernel name”> and <”My Official Kernel Name”>.
python -m ipykernel install --user --name=<"kernel name"> --display-name=<"My Official Kernel Name">
Confirm that you’ve added the kernel by running
jupyter kernelspec list
Your list of kernels will look something like this:
Available kernels:
  test       /research-home/myname/.local/share/jupyter/kernels/test
  python3    /research-home/myname/.local/share/virtualenvs/mydirectory-44neAqC_/share/jupyter/kernels/python3
5) Restart server
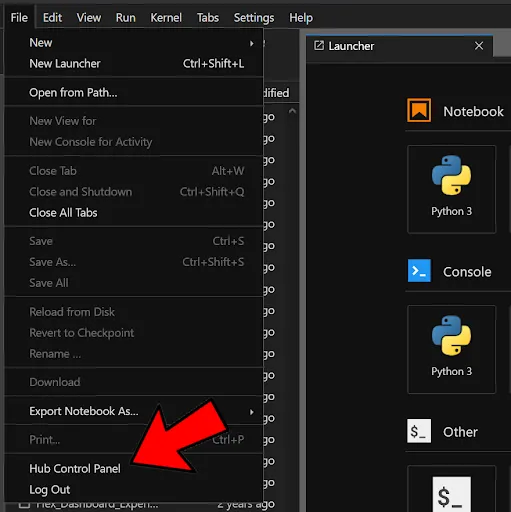
Now, you’ll need to stop your current Jupyter server (if running). Go to the drop-down menu File > Hub Control Panel.
Image
This will pop open a new tab/window, and you’ll click “Stop My Server”.
Image

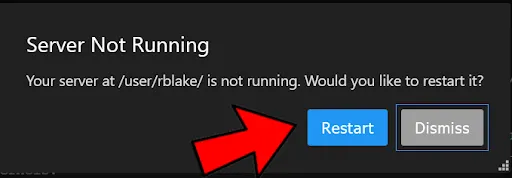
Jupyter lab will then ask if you’d like to restart your server; click Restart.
Image
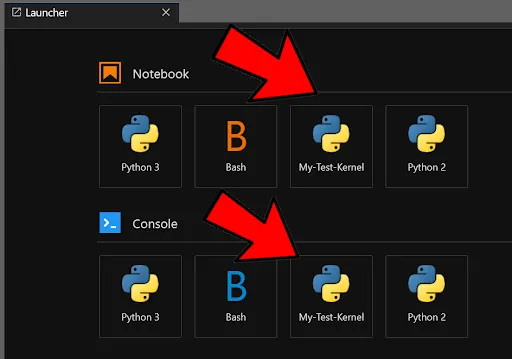
Once it restarts, you will see the new kernel in the Launcher, with the name you gave it during set-up.
Image
Again, if you have multiple projects for which you would like separate virtual environments, you can run the above set-up code sequence to create a different virtual environment in each separate project directory.
6) Install additional packages into your virtual environment
To install other Python packages into your virtual environment, you will need to open a Terminal window, change to the directory where your Pipfile is located, and run
pipenv install name-of-packages
to install packages. This is the same way you installed the ipykernel package as described above.
7) Using your virtual environment in Slurm jobs
If your code has high processing time or memory requirements, and it’s too much to run on the Jupyter server, it’s possible to use the virtual environment within a Slurm job as well, running your Python code as a script (.py file) rather than a notebook (.ipynb file). You will need to call pipenv in your Slurm job script to run the Python script.
If your Pipfile is in the directory /research-home/myusername/my_cooltrees_code, and your .py script is located at /research-home/myusername/my_cooltrees_code/coolscript.py, your Slurm job submission script might look like this:
#!/bin/bash
#SBATCH -n 1

cd /research-home/myusername/my_cooltrees_code
pipenv run python coolscript.py
For more details see the Quick Start on using the SESYNC cluster.
8) Delete when finished
If you would like to delete your kernel at any point, run the following (replacing test-kernel with the name of your kernel).
jupyter kernelspec uninstall test-kernel
It will ask you to confirm the deletion by typing y or cancel the deletion by typing N.
Share